How to share files on VirtualBox
During the virtual emulation the probability to share files between virtual machine and host is vital for the end user. Instead of downloading the files in the virtual environment, when the Ethernet-connection is not working properly, it is much easier to transfer the corresponding file objects from host OS to VM or backwards and start using it right at the place. This feature is especially useful when you customize or configure anything and you need access to the file objects anywhere and anytime. In this text note I am going to precisely describe the procedure of sharing files between VirtualBox and host, how to arrange the common method of exchanging file objects and how does the virtual transfer work.
the very start, I should mention, that you may exchange files between VirtualBox VM and host system either in Windows or Linux operational environment, and the methodic is quite similar and almost identical. If you want to transfer some objects from host operational system to the virtual machine, you need to install VirtualBox Guest Additions image disk in the guest VM. This is required for the virtual environment to actually see the appropriate shared files in the host system and to apply it correspondingly. In order to install the described before image disk address to the upper menu of the application and click Devices -> Insert Guest Additions CD Image item. In such a non-intricate way a required installer will be run.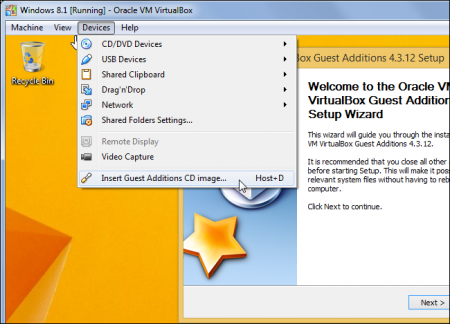
Follow the screen instructions and set up the predefined feature in the guest OS. The setting up routine will take a bit more than a minute from you, but during the walkthrough of the process you will be given strict instructions. After setup is performed, the virtual OS would require the reboot. Thus, you will receive an appropriate notification concerning this.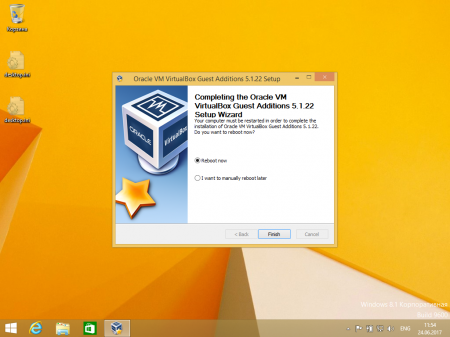
When the virtual machine would reboot, click the Machine -> Settings item in the guest OS upper menu and select Shared Folders subcategory. Right here you may customize the shared folders, available to the user. You may configure two types of common directories: Transient and Machine. Transient folders are temporary objects which are scheduled to be deleted from view when the virtual environment shuts down or restarts. At the same time, Machine Folders are permanent objects, which will be visible in the constant manner, until they are removed manually from the virtual OS.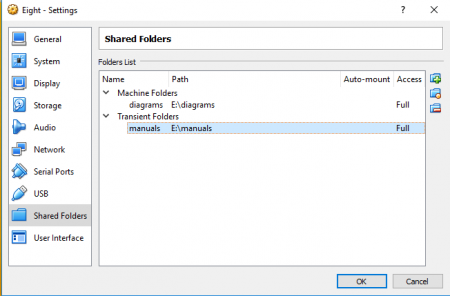
If you desire to add a new shared folder to the list, click the Add icon in the right section of the form.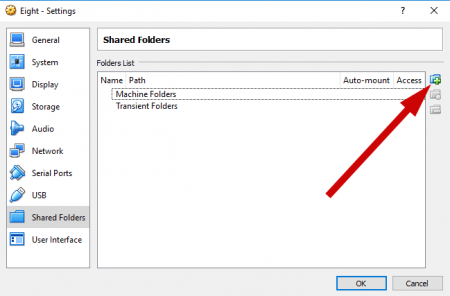
Now the time has come to customize the new added shared folder. In the Folder Path field define the path to the specified common folder on the host OS. At that very moment, the Folder Name field relates to the name of the folder, under which it will be accessible in the virtual guest OS. A bit lower some of the additional settings are presented, like Read Only and Make Permanent checkboxes. By default, the shared folders are given the full access rights, including writing and modifying of the content, but by setting the Read Only checkbox you can restrict the rights of the user, in such a way limiting his possibilities to the allowed level. At the same time, the Make Permanent checkbox puts the corresponding folders to the Machine folders section. 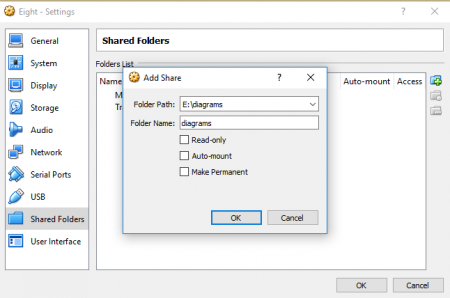
At the ending part a few words about how to access the defined common folder. Open the explorer, unroll a Network section, and inside of it you will notice the “VBOXSVR” shared PC. This is the common folder category, designed by the virtual machine. Open it and you will be able to see all the shared directories as an included content right in there.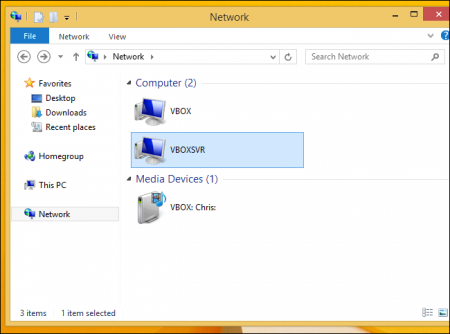
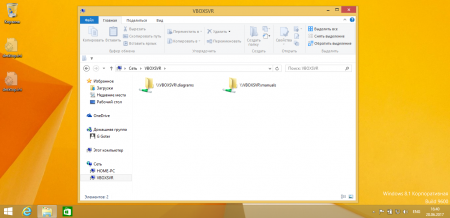
In such a way, I could clarify for you a topic “How to share files on VirtualBox?”. This methodic will for sure help to arrange a connection between the virtual machine and the host environment, so feel free to use it anytime and anywhere you need.

Similar Materials